Mulberry cultivation
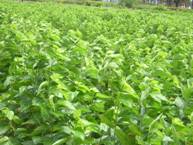
Mulberry (Morus spp., Moraceae)
The important character of the members of the family Moraceae (especially Morus spp.) is the presence of idioblast, an enlarged epidermal cell in the leaf.
Ecological requirements
Climate
Mulberry can be grown upto 800 m MSL. For the optimum growth of mulberry and good sprouting of the buds, the mean atmospheric temperature should be in the range of 13oC to 37.7oC. The ideal temperature should be between 24 and 28oC with relative humidity of 65 to 80 percent and sun shine duration of 5 to 12 hours per day.
Mulberry can be grown in a rainfall range of 600mm to 2500mm. Under low rainfall conditions, the growth is limited and requires supplemental irrigation. On an average, 50mm once in 10 days is considered ideal for mulberry.
Soil
 |
Slightly acidic soils (6.2 to 6.8 pH) free from injurious salts are ideal for good growth of mulberry plant. Saline and alkaline soils are not preferred.
Mulberry varieties
Irrigated : Kanva 2, MR 2, S 30, S 36, S 54, DD (Viswa), V1
Semi irrigated : Kanva 2, MR 2
Rainfed : S 13, S 34, RFS 135, RFS 175, S 1635
Propagation of mulberry
- Mulberry is mostly propagated through cuttings.
- Cuttings may be planted straight away in the main field itself or nursery may be raised and the sprouted and rooted saplings may be planted in the main field.
- The latter method is advisable because of its easy establishment in the main field.
Selection of planting material
- Generally, the mulberry plants are raised from semi-hardwood cuttings.
- Cuttings are selected from well established garden of 8-12 months old.
- Only full grown thick main stems, free from insect and disease damages having a diameter of 10-12mm are chosen for preparation of cuttings.
- The cuttings should be of 15-20 cm with 3-4 active buds and should have 45o slanting cut at the bottom end.
- Care should be taken to make a sharp clean cut at both the ends of cuttings without splitting the bark.
- Manually/power operated mulberry cutter (stem cutting machine) is available for quick cutting of propagation material.
Nursery
Nursery bed preparation
- Select 800 sq.m. area of red loamy soil near water source for raising saplings for planting one hectare of main field.
- Apply 1600 kg of Farm Yard Manure (FYM) @ 20 t/ha and mix well with the soil.
- Raise nursery beds of 4m x 1.5m size.
- The length may be of convenient size depending upon the slope, irrigation source, etc.
- Provide a drainage channel and avoid shady area.
Pre-treatment of cuttings
- Mix one kilogram of Azospirillum culture in 40 liters of water.
- Keep the bottom end of the cuttings for 30 minutes in it before planting. Azospirillum is applied for inducement of early rooting.
Nursery planting
- Apply VAM @ 100 g/m2 of nursery area.
- Irrigate the nursery bed. Plant the cuttings in the nursery at 15 cm x 7 cm spacing at an angle of 45o.
- Ensure exposure of one active bud in each cutting.
Nursery management
- Irrigate the nursery once in three days.
- Dust one kg of any one of the following chemicals around the nursery bed to avoid termite attack.
1. malathion 5 D
2. quinalphos 1.5 D
To avoid root rot and collar rot, drench the soil with carbendazim 50 WP (2 g/l) or apply Trichoderma viride 0.5 g/m2 using rose can.
- After weeding, apply 100 g of urea/m2 between 55 and 60 days after planting at the time of weeding.
Age of sapling
- The saplings are ready for transplanting in the main field after 90-120 days of planting.
Planting methods

Paired row system : Plant the cuttings/saplings at a spacing of 75 / 105 cm x 90 cm. Raise intercrops in the wider inter row space (amenable for mechanization also).
Planting method |
Spacing (cm) |
|
Irrigated |
Rainfed |
Ridges and furrows |
60 x 60 / 90x90 |
90 x 90 |
Pit system |
90 x 90 |
90 x 90 |
No. of cuttings / ha. - 27,780 (60 x 60 cm) ; 12,345 (90 x 90 cm)
Time of planting
- Plant during rainy season
- Avoid planting during winter and summer months
Planting of saplings
Plant the well rooted and sprouted saplings at a depth of 15-20 cm
- Earth up and level the area around the saplings
- Gap fill during monsoon months.
Nutrient management
a) Irrigated / semi irrigated (kg/ha)
|
Row system |
Pit system |
|
N |
P |
K |
N |
P |
K |
Recommendation |
300 |
120 |
120 |
280 |
120 |
120 |
Split doses |
First crop |
60 |
60 |
60 |
60 |
60 |
60 |
Second crop |
60 |
- |
- |
40 |
- |
- |
Third crop |
60 |
60 |
60 |
40 |
- |
- |
Fourth crop |
60 |
- |
- |
60 |
60 |
60 |
Fifth crop |
60 |
- |
- |
40 |
- |
- |
Sixth crop |
- |
- |
- |
40 |
- |
- |
- For V1, fertilizer schedule is 375 : 140 : 140 kg NPK/ha.
- Apply fertilizers as per soil recommendation wherever possible
- Apply the first dose of fertilizers three months after planting
- Follow subsequent fertilizer application after each leaf harvest and pruning
- Apply straight fertilizers to minimize the cost
b) Rainfed (Kg/ha)
|
N |
P |
K |
Recommendation |
100 |
50 |
50 |
First dose |
50 |
50 |
50 |
Second dose |
50 |
- |
- |
- Apply the first and second doses coinciding with South West and North East monsoons respectively.
Bio-fertilizers
- Apply Azospirillum @ 20 kg/ha in five split doses. Apply phosphobacterium @ 10 kg/h in two equal splits.
- Mix the bio-fertilizers with 50 kg of FYM for uniform distribution
- Ensure irrigation after application
- Do not mix bio-fertilizers with inorganic fertilizers
- Growing and insitu incorporation of sunnhemp.
Micro nutrients
- Apply recommended major/secondary nutrients based on the deficiency symptoms.
- For micro nutrients according to the deficiency symptom expressed, apply micronutrients as foliar spary @ Zinc sulphate 5 g, Ferrous sulphate 10 g, Borax 2.5 g, Copper sulphate 2.5 g, Manganese 2.5 g or Sodium molybdate 100 mg/lit of water using high volume sprayer (spray fluid 500 lit/ha).
- Add wetting agent, Teepol @ 0.5 ml/lit. for better adherence on the foliage.
Methods of Irrigation
Ridges and furrows method
- Most efficient method of irrigation
- Comparatively requires less amount of water
- The furrows serve as drainage channels during heavy rainfall.
Flat bed method
- Rectangular beds and channels are formed
- Water run off is relatively low
- More land is wasted and requires more labour for field preparation.
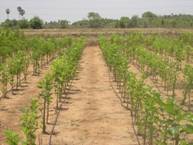
Drip Irrigation
- Most efficient in water use
- Substantial saving in irrigation water
- Better crop growth
- Suitable for undulating terrains
- Fertilizers can also be applied along with irrigation water
- Clogging of emitters by physical, chemical and biological impurities
- Initial cost is very high
Weed Flora
The common weed flora in the mulberry garden is given below.
Botanical name |
Tamil name |
English name |
1. MONOCOTYLEDONOUS WEEDS (Grassy weeds) |
Cyperus rotundus |
Korai |
Nut grass |
Cynodon dactylon |
Arugampull |
Bermuda grass |
2. DICOTYLEDONOUS WEEDS (Broad leaves) |
Abutilon indicum |
Thuthi
|
Velvet leaf |
Amaranthus viridis |
Kuppaikeerai |
Pig weed |
Acalypha indica
|
Kuppaimeni |
Copper leaf |
Boerhaevia diffusa |
Mookaratai |
Hog weed |
Croton sparsiflorus |
Milakai poondu |
Croton |
Parthenium hysterophorus
|
Vizhachedi |
Carrot grass |
Trianthema portulacastrum
|
Saranai |
Carpet grass |
Tridax procumbens |
Manjapoo |
Tridax |
Integrated Weed Management
Cultural method
- Remove the stubbles and roots of weeds while preparing the land
- Use well decomposed manure to avoid dissemination of weeds
- Clean the implements before use
Mechanical method
- Operate country plough after pruning in the interspace
- Remove the weeds by hand hoe
Chemical method
- As post-emergence application, use Paraquat (Grammoxone) @ 2-3 lit/ha.
- Spray Glycel 7.5 ml with 10 grams of ammonium sulphate per litre of water as post-emergence application. A total of 600 litres of spray fluid is required/ha.
- Use flooding / deflector / fan type nozzle for spraying weedicide. Apply the weedicide immediately after pruning or within 2-3 days after pruning.
Intercropping
Intercropping with short duration pulse crop enriches the soil, gives additional revenue and also controls the weed growth. Grow any one of the following crops / varieties as intercrop
Black gram - Co 5, VBN 1, VBN 3, VBN 4
Green gram - Co 5, Paiyur 1, Pusa bold, VBN 2, VRM 1, Co 6
Cowpea - Co 4, Co 5, Pusa 152
- Seed rate : 10 kg/ha
- Sow the intercrop after pruning and earthing up
Mulching
Mulching with pruned mulberry twigs and other materials like straw and dried leaves will have the following advantages
- Controls weed growth
- Conserves soil moisture by reducing run-off
- Increases the infiltration of water
- Reduces the soil temperature
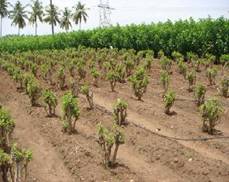
Pruning methods
i) Bottom pruning
The plants are cut at ground level leaving 10-15 cm stump above the ground. This type of pruning is done once in a year.
ii) Middle pruning
The branches are cut at 40-60 cm above the ground level. After bottom pruning, subsequent cuts are made at 45-50 cm height.
iii) Kolar or Strip system
In closely planted area, this type of pruning is done. The branches are cut at ground level every time. Thus, it receives five prunings every year. This type of severe pruning requires heavy fertilization and irrigation.
Harvesting
The method of leaf harvest depends on the type of rearing practiced. It is preferable to harvest the leaves during morning hours. There are three methods of harvesting of mulberry leaves
Leaf picking
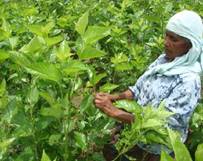 |
Individual leaves are harvested with or without petiole. Leaf picking starts 10 weeks after bottom pruning and subsequent pickings are done at an interval of 7 - 8 weeks.
Branch cutting
The entire branches are cut and fed to the worms. Before that, topping is done to ensure uniform maturity of the lower leaves.
Whole shoot harvest
The branches are cut at ground level by bottom pruning. Shoots are harvested at an interval of 10-12 weeks and thus 5 to 6 harvests are made in a year.
Time of harvest
It is preferable to harvest the leaves during morning hours.
Preservation of leaves
Use leaf preservation chamber or wet gunny bags to store the leaves or cover the bamboo basket with wet gunny bags to keep it cool and fresh. |


